News, reviews, and updates from the estate.
Cooking with Crosby Roamann: Sourdough Baguettes
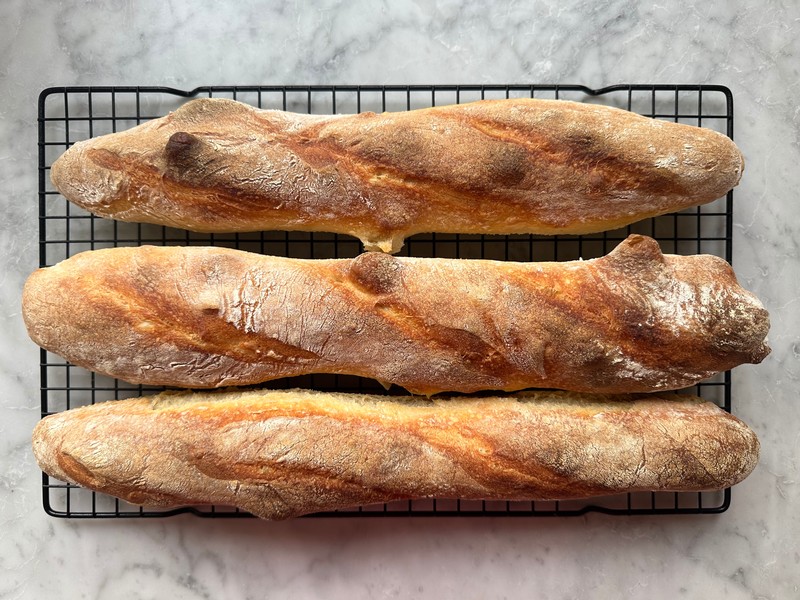
Every other week or so as I prepare our weekend bread, I decide to alter the recipe just a little bit, and more often than not, that alteration simply leads to baguettes. They're a little more difficult to make, and a little more work, but they are delicious straight out of the oven, they store well for a day (if they even last that long) and they freeze very well wrapped in plastic wrap and defrost easily, extending the amount of time you can enjoy them. The only slight complication is that you will need a baguette pan to make them – but you can find one HERE.
The other consideration when we are making baguettes is the flour. I am one of the roughly 35% of the US population with a gene variant that prevents my body from methylating Folic Acid (a common ingredient in "enriched" flour). From Gemini: "It's estimated that up to 50% of people may have a genetic variant, specifically a polymorphism in the MTHFR gene, that reduces their ability to convert folic acid (the synthetic form of folate) to its active form, L-methylfolate. This can affect their ability to properly absorb and utilize folic acid, including that found in fortified bread."
My problem is that when I ingest products that are "enriched" with Folic Acid, I feel kind of disgusting -- bloated, gassy, etc. TMI? Sorry!
I've found that it's really rather common for people with this gene variant to complain about how they feel after eating domestically produced bread and pasta (the pasta! ugh...) but then when they go to ITALY, it's a totally different story. In Italy, I am told, the wheat -- how it is grown and produced and packaged -- is all totally different, and it doesn't contain Folic Acid. Maybe you’re like me, maybe not, but I could eat pizza and pasta every day in Italy and not feel sick...well, not as sick, or sick but just in a different way, like from over-eating because it's so good
So with all that in mind, I have been looking for a way to incorporate a similarly healthy flour ingredient into my baking and pasta-making. Something that I can enjoy without feeling guilty and sick about ingesting all that gluten.
Enter – organic flour. I have been rotating three different types of flour in our kitchen for our breads in general. The first is Bob's Red Mill Organic Unbleached All-Purpose White Flour. I have had very good results with this bread, and I’ve never felt “kind-of-off” after eating it. The texture of the dough when mixed with the yeast starter and water has a good texture that is easy to mold and the flavor is fantastic.
We’ve also used Bob’s Red Mill Unbleached Enriched Bread Flour – the trade off here being that is, in fact, BREAD flour, not-all purpose flour, but it is NOT organic, it is enriched. For whatever reason, I have had slightly less good results with this flour – I’m really not sure why.
The other flour really worth a try, however, is the King Arthur Organic Bread Flour. On the surface of it, this should be the perfect product. The only problem is, again – for whatever reason, and I’m really not sure what it is – I just don’t love the texture of the dough this makes as it is formed, and I’m not sure I get the same flavor or texture out of the dough. So, I keep coming back to the Red Mill Organic All Purpose Flour. That being said, the differences are fairly minor, and you will get remarkable results with this recipe with any of these ingredients.
Ingredients:
100g sourdough starter from the fridge (GO HERE for your sourdough starter recipe)
385g very warm water (we use about 110-120F tap water)
520g (organic) bread flour (plus a large pinch for rolling out and shaping baguettes)
12g Kosher salt
Directions:
The night before you plan to bake –
Combine all the ingredients in a large bowl and combine until you form a shaggy dough. The dough will stick to the spoon, your fingers, the bowl – everything. That’s ok! Run a little warm water in the sink and using wet fingers, gently pinch off the sticky dough from the spoon, then wet the spoon, and gently scrape the dough off the sides of the bowl. Combine all the dough in one heap in the middle of the bowl. Using a wet paper towl, wipe down the sides of the bowl – mostly just to clean it up a little bit. Then drape a moist kitchen towel over the bowl of dough and set it aside for 30 minutes.
After 30 minutes, you’re going to perform your first “turn” of the dough. Run some cool water and wet the fingers on your dominant hand. Using your finger tips and wet fingers, scrape the sides of the dough down from the bowl. When the sides of the dough have been released from the bowl, wet your fingers and scrape up the bottom of the dough from the bottom of the bowl.
Once the dough is fully released from sticking to the bowl, grasp one side of the dough and pull it straight up about 12-18 inches with your dominant hand, then fold it over the other side.
Rotate the bowl 90 degrees, grasp the thick fold of the dough that you just created by folding it over itself, and once again raise it up 12-18 inches and fold it over itself.
Repeat this process 1 or 2 more times, until you are satisfied that the dough has been fully folded.
The folding process will lengthen and strengthen the glutens in your bread, forming a texture within which the sourdough fermentation process can create lots of little, and some large bubbles, forming the ultimate structure of your bread.
Set a timer for another 20-30 minutes (whatever your schedule will allow) and repeat the entire process one more time. If you’re feeling extra frisky, you can even perform a third turning after another 20-30 minute rest.
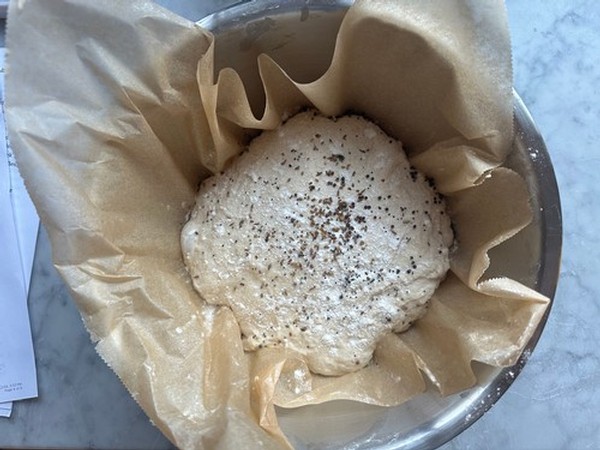
At the conclusion of the folding process, cover your bread-dough bowl with a damp kitchen towel and find a nice little quiet and out of the way place for it to rise overnight.
In the morning, your dough is going to look like this:
Unlike our sourdough boule, to make baguettes, we’re going to lightly flour a clean and dry workspace (I like to use a large wooden cutting board, turned upside down).
Once again, run some cool water in the sink, and wet the fingers on your dominant hand.
Once again, using your fingertips – scrape down the bread off the sides of the bowl and gently release it from the bottom of the bowl.
Then gently tip the dough out of the bowl and allow it to fall upside down on the floured work space.
Sprinkle more dough over the top (what was once the bottom) of the dough.
Cut the bread directly in half, and scrape any wet dough off the knife back onto one side of the dough, like so …
Flatten the dough into a 1/2 inch thick and 4 inch by 8 inch rectangle, like this …
Then fold one inch up …
and one inch down like so …
Then fold once more, away from you, in half, to make a 1-2 inch wide rectangle.
Roll the dough away from you one-quarter turn, so the “seam” (i.e., the gap between the folded sides) is now on the bottom, and you have a nice fluffy looking baguette shape, like this …
Using both hands, gently roll, shake, cajole, and pull the dough into your desired baguette shape, then transfer it to one side of your baguette pan and stretch it out to your desired length.
Repeat this process on baguette number two.
You now have two baguette doughs resting in the baguette pan. Let them rest. It’s been a long morning. Have some coffee! You’ve earned it. Cover them with your damp kitchen towel and set them aside for 30 minutes to an hour, depending on how spongy you want them when baked. Go walk the dog(s), or make the beds, hop in the shower, or go to the gym, whatever makes you happy. In about 60 minutes, however, you want to come back to those baguettes and you want to transfer them to the refrigerator, uncovered, to chill for 30-60 minutes. And that’s when you preheat the oven to 500F with one rack directly in the middle of the oven and another rack towards the bottom.
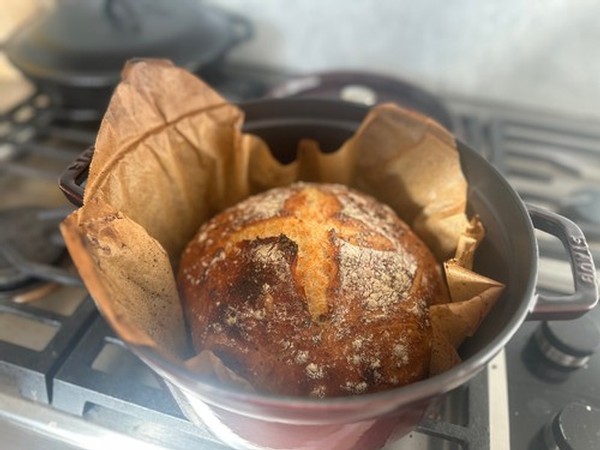
Back at 500F for 15 minutes with a small baking dish with 5-10 ice cubes to hydrate the air in the oven.
At the end of 15 minutes, turn the temperature down to 450 and bake for another 15 minutes. (If the crust isn’t quite golden brown enough for you at the conclusion of 30 minutes of baking, go ahead and try another 2-3 minutes at 450. Sometimes my own oven needs another 2-3 minutes of baking at 450F to get the crust on our baguettes just the way I like it, see picture.)
Cooking with Crosby Roamann: Shepherd's Pie

Ingredients
- 1 tblspn each Olive oil and butter to sauté onions
- 3 Cloves garlic optional
- 1lb ground lamb
- 1lb ground beef
- 1 medium onion, chopped
- 1 box/can of chopped tomatoes
- 1 tblspn each rosemary, sage, thyme, sea salt
- Pepper to taste
- 1 bag of frozen peas and carrots
- 3 medium russet potatoes, peeled, sliced, and boiled for mashed potatoes with butter and sour cream
- 2 cups grated shard. Cheddar cheese

Preparation
- Melt the butter and olive in a large skillet over medium-high heat
- Saute the onions (and garlic) for 10 minutes, just until they start to brown and stick to the pan, then remove the onions from the skillet
- Add the ground beef and lamb together and season with salt and dried herbs, and brown the meat all over, about ten minutes, crushing and turning the meat as you go.
- Add the box of chopped tomatoes and stir to bring the meat and tomatoes all together
- Let this simmer for 15 minutes, stirring occasionally.
- Meanwhile, prepare your mashed potatoes topping by boiling your peeling and sliced potatoes in just enough water to cover them. When they are soft and crush easily (about 10-15 minutes), pour off the remaining water, return the potatoes to the pot, and add about 1/3 cup each of butter and sour cream. Mash these all together with a hand masher and fork for a soft and creamy consistency.
- At the end of the simmer, add one bag of frozen peas and carrots, and bring the mixture all together.
- When the meat sauce and the potatoes are ready, assemble your Shepherd's pie ~ layer the bottom of a 9x13 metal pan evenly with your meat sauce (about 1/2 inch thick), then apply a 1/2 inch thick layer of mashed potatoes on top. Sprinkle the top of the mashed potatoes with grated, shard cheddar cheese.
- Bake at 350F for 35-45 minutes, until the cheese topping is melted, lightly browned, and the meat sauce is bubbling up around the edges of the dish.
Cooking with Crosby Roamann: Sourdough boule with Cranberries and Walnuts
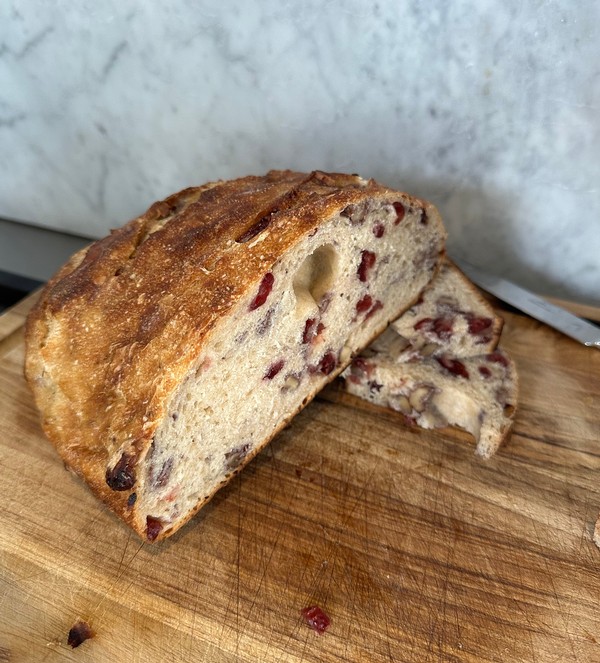
To change things up this week Juliana suggested we add dried cranberries and walnuts to our weekly sourdough. We added a half cup of dried cranberries and a half-cup of chopped walnuts and folded them into the dough as we performed our first three stretchings of the dough. We then let it rest overnight to rise. In the morning, we transferred the risen dough to a clean bowl, chilled it for an hour in the fridge (while the over heated up) and then baked it using our standard recipe from FeastAtHome.com for 15 minutes at 500F covered, and another 15 minutes at 450F uncovered. I found that I preferred this bread slightly toasted and slathered with butter, but then again, I always do!
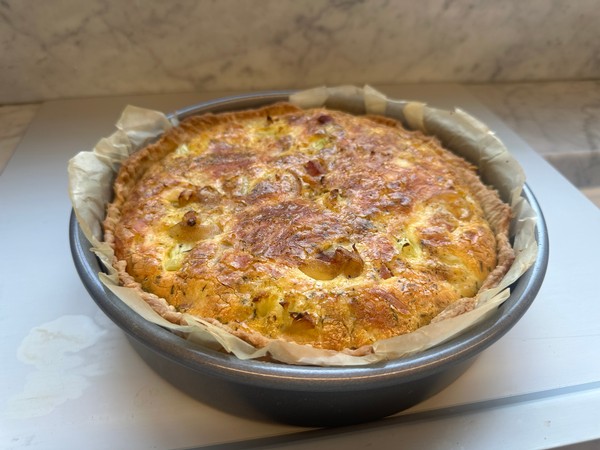
Cooking with Crosby Roamann: Spring Quiche with Cauliflower, Ham & Gruyere
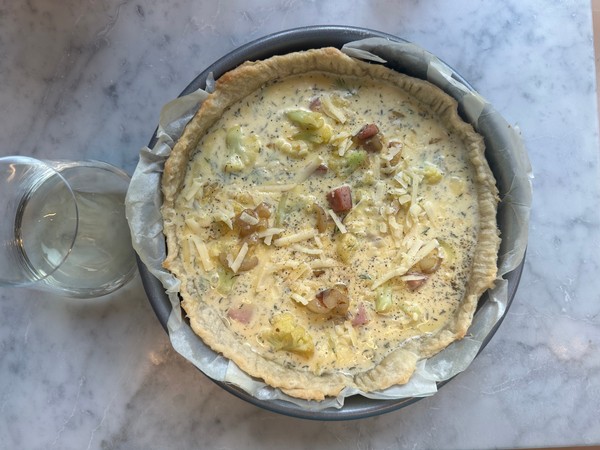
Quiche starts to make an appearance in our house around this time of year, maybe because it makes such a wonderful Sunday Brunch. We like to include things from our winter garden -- chives, scallions, green onions, dill, and cauliflower -- and pair it with a well-chilled bottle of our Sauvignon Blanc -- as we like to serve it with winter lettuces fresh from the garden.
Our basic pie dough crust comes from Smitten Kitchen (you can find it here). We follow the instructions as closely as we can and always love the results -- a slightly sweet pie dough that matches well with anything from a savory quiche to a Maple Cream Pie.
For our spring quiche filling we use 5 eggs, 1 cup of cream, and 2 cups of grated gruyere cheese, plus two shallots, two cups of cauliflower florets, and one and a half cups of cubed ham steak, sauteed in three tablespoons of butter until gently browned all over.
Ingredients
- Smitten Kitchen Basic Pie Dough
- 5 eggs
- 1 cup of cream
- 2 cups of grated gruyere cheese
- 2 shallots, sliced very thinly
- 2 cups of cauliflower florets, about 1" each
- 1.5 cups of cubed ham steak, about 1/2" cubes
- 3 tablespoons of butter
- 3 tablespoons of olive oil
- Salt and pepper to taste
- 1 tablespoon fresh dill, minced
- 1 tablespoon diced chives, optional
Directions
- Prepare the pie dough and par-bake it, set it aside to cool.
- Reduce the over temperature to 300F
- In a large sauce pan, sautee the shallots, cauliflower, and ham steak in the butter and olive oil, until they are lightly browned, about 10 minutes, stirring along the way. Then set these aside to cool.
- Meanwhile, combine the eggs and cream in a medium bowl and whisk to combine. Add the cheese.
- When the cauliflower mix has cooled slightly, add this to the bowl of eggs and cream. Add the fresh dill, and stir to combine. Add the chives if desired.
- Set the pie shell in a rimmed baking sheet (for ease of transport).
- Fill the pie shell to the edge with your quiche filling, and transfer it to the middle shelf in the oven.
- Bake for 50 minutes at 300F, or until a knife inserted in the middle comes out clean.
Enjoy with a nicely chilled glass of our Sauvignon Blanc.
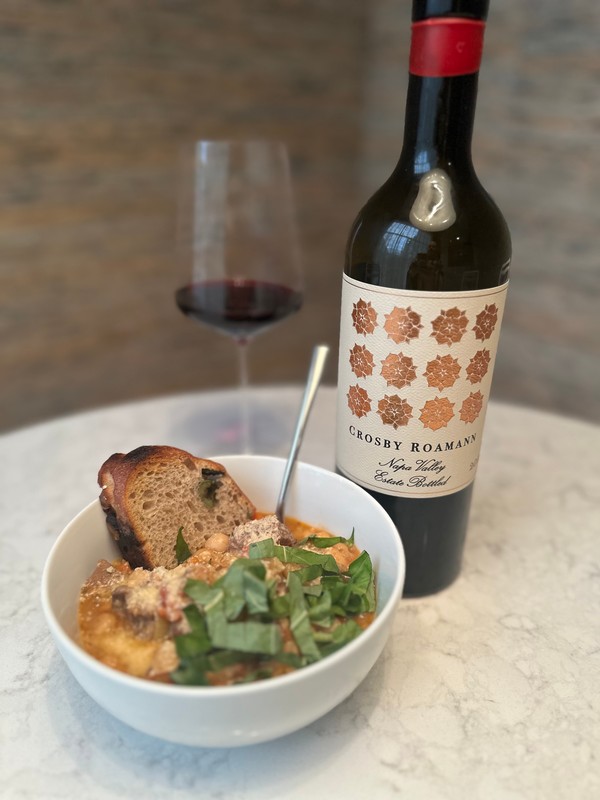
Cooking with Crosby Roamann: Lamb Stew with White Beans paired with Estate Red wine
INGREDIENTS
- 4 clove garlic, sliced very thinly
- 2 carrots, chopped into ½” pieces
- 1 celery, chopped into ¼” pieces
- 1 onion, chopped ¼” pieces
- 1” peeled fresh ginger, chopped (optional) diced
- 1 box chicken stock
- 1 can diced tomatoes
- 2 dashes Tobasco
- 1 cup dry white wine
- 2 lb. boneless lamb shoulder
- 1 lb. mild Italian sausage links
- 1 lb. dry Northern white beans, soaked overnight
- Kosher salt and pepper
- Chopped flat-leaf parsley or basil and crusty French bread, for serving
DIRECTIONS
- Hydrate beans overnight, rinse and clean
- Preheat the oven to 350F.
- In a large saute pan, sauté carrots, celery, onion, garlic, and ginger, just lightly ~ 5 minutes
- Add the wine and reduce to simmer to burn-off alcohol ~ 5 minutes
- Combine the sautéed garlic, carrots, celery, onion, and ginger with the white beans in a 5- to 6-qt Dutch oven, and cover with chicken stock (top with water if necessary).
- Return the saute pan to the heat and add another 2 tablespoon of olive oil. Season the lamb with salt and pepper, and working in batches, slowly brown the meat before adding it to the dutch oven.
- When you have added all the lamb to the dutch oven, and tucked the meat in nicely with the beans, cover the Dutch oven and put it in the oven to cook on 350F for the first hour.
- Have a glass of wine!
- While the lamb is cooking for the first hour, sauté the sausage links briefly next, then let them cool. Slice them into 1 inch pieces on a bias, and at the end of the first hour of cooking lamb, then add the sausage pieces to the dutch oven.
- Add the tomatoes and gently mix everything together.
- Cook 1-2 more hours on low to combine. The lamb should be soft and easy to pull apart with a fork.
- Sprinkle with the parsley or julienned basil, and serve with our sourdough boule.
Cooking with Crosby Roamann: Sourdough
Every year, as our grapes slowly ripen, we take fruit samples from the vineyard. Sampling begins generally in mid-August for our Sauvignon Blanc, and continue through our last harvest of the vintage, typically mid-October. The practice is simple, but time-consuming. A 100 to 200-berry sample is collected in a sandwich bag from each block being tested by gently harvesting one berry per cluster from roughly every-other vine until we've reached our sample collection target. We then crush the berries in the sample and chill them to 68F. Then we check the sugar content (i.e. Brix) in a refractometer. Sometimes, the juice sample is sent out for professional chemistry including acidity and pH, among other things.
If the weather is just right, the grapes will be the right temperate for testing with our refractometer right there in the field, and then often the jucie samples get left in the car ... and forgotten, and a day or two later, they will begin to ferment.
This year, I decided to put some of these spontaneous grape sample fermentations to good use. Following a recipe from Sylvia Fountain at FeastingAtHome.com, I collected the juice from our berry samples and made a sourdough bread starter with it. The results have been incredible.
I followed the traditional sourdough starter recipe -- 1/2 cup wholewheat flour, and 1 cup water -- but to this I added 1/4 cup of fermenting grape juice. I made this addition two or three times over the course of the first week as the starter got going. When we made our first boule, at the end of that first week getting the starter going, I added an additional 1/4 cup of fermenting grape juice.
Cooking with Crosby Roamann: Sweet "Hungarian" Paprika

It was one of those special days of the year when, over the weekend, Juliana and I harvested a grocery bag's worth of bright red Hungarian-bred sweet red peppers and brought them home to process. The process is relatively easy. We wash and dry the peppers, and then cut them lengthwise by hand and remove most of the ribs and seeds. Next we lay them out on a large rimmed baking sheet lined with parchment pepper. Then we dry them in the oven at the lowest temperature we can get, which in our oven is only 200F (a lower temperature of 140 would be ideal, but it would take longer ... much, much, much longer). The drying process at 200F takes about 5-6 hours, after which we let the dried peppers cool over night. In the morning, we crush them by hand, and process them into a fine powder in our spice grinder (from Cuisinart). Lastly, storage! We keep our sweet "Hungarian" paprika in an air-tight container in the fridge, in which condition it will last all year long, and often longer.
Interested in learning more? Let us know! Visit the "Contact us" page and give us a shout.
Next recipe coming up -- Chicken Paprikas.
Cooking with Crosby Roamann: Feta Cheese Toast


Feta Cheese Toast
- Tablespoon butter
- 4-6 slices good bread, about ½ inch thick, toasted
- 4-6 slices good prosciutto
- Garlic powder to taste
- Maldon sea salt to taste
- Cracked fresh pepper to taste
- Ground cumin pinch to taste
- Dry oregano or fresh garnish to taste
- 2 tablespoons Olio Nuovo or good olive oil
- Leftover crumbled Feta cheese, about 4 oz.
Prep
- Place 1 tablespoon butter on a large plate and microwave on high for 40 seconds
- Meanwhile, toast 4-6 pieces of good bread, like a sourdough boule.
- Place the toast in the butter and sprinkle a pinch of garlic salt on them, then flip them over, and place a piece of prosciutto on each slice of toast, tucking the edges of the prosciutto under the bread.
- Layer on your crumbled Feta cheese generously.
- Sprinkle the tops with Maldon Sea Salt, cracked fresh pepper, a touch of ground cumin (just a little pinch!) and a touch of dry (we used fresh) oregano (use a little more if you want a garnish).
- Then drizzle your best olive oil (we used our Olio Nuovo from 2023) generously over the tops of the toast – about 2 tablespoons worth.
Et voila! Feta Cheese Toast. We paired this with our Tuna Puttanesca, pictured below, and a bottle of good old Merlot. What I love about these little dishes is that I had everything I needed to make them at home. They are so simple and delicious and comforting and we didn't even have to go grocery shopping for anything! Did you know, "Puttanesca translates as “in the style of the whore.” The name derives from the Italian word puttana which means whore. Puttana in turn arises from the Latin word putida which means stinking." But boy, what a dish! xo

Cooking with Crosby Roamann: West Coast Style Gefilte Fish

There is one common staple in our house over Passover, and that is gefilte fish. Traditionally, I make enough for everyone, and then am the only one to eat it. But that’s ok. These things take time. I didn’t love, or even like, or even try, gefilte fish when I was a kid either.
When we lived in NY, it was easy enough to purchase really good gefilte from one of our local grocers, but here in wine country – no such luck. So, I took to making it myself from scratch when we moved here. The first versions weren’t very good -- it turned out to be nearly impossible to find the traditional fish in the right quantities in California. So, I adapted.
Our recipe is a “west coast” adaptation of the basic gefilte recipe from the great book The Gefilte Manifesto. All of the ingredients are easy to find at almost any good fishmonger and grocer this time of year.
Enjoy, and happy pesach.
West Coast Style Gefilte Fish
For the fish stock
- 1 lb spine and head, Halibut bones
- 4 qts water
- 1 Tbsp kosher salt
- 2 small onions
- 4 medium whole carrots
- 3 Tbsp sugar
Add all ingredients and simmer for 45 minutes. Strain the stock and remove the carrots, cutting them into 1” pieces and set ting them aside. Discard the remaining solids and return the stock to the stove top.

For the Gefilte Quenelles
- 1 lb California or Canadian Halibut fillet, skinned
- 1 lb California Sturgeon fillet, skinned
- 2 small onions
- 2 small eggs
- 2 Tbsp vegetable oil
- 2 Tbsp chopped fresh dill (plus more fresh sprigs for garnish set aside)
- 2 Tbsp sugar
- 1 Tbsp kosher salt
- ¼ tspn fresh ground black pepper
- ¼ cup Matzah meal
- Horseradish, fresh, for serving.
Prep
- Grind the onions, then the fish with it, and then all the remaining ingredients in a food processor. Remove the Gefilte mix to a bowl, cover and refrigerate for 30 minutes.
- Begin to reheat the stock on low. It should be warm, not hot/cold.
- Wet your hands, and roll out large egg-shaped quenelles, just smaller than a tennis ball. Place them gently in the stock using a slotted spoon, one by one.
- You should have about 12-14 quenelles, depending on size.
- Cover and boil the stock and quenelles on medium high for 30 minutes. Then let cool slightly.
- Line a serving dish with carrots and quenelles, then cover with stock, and garnish with a few fresh sprigs of dill, then wrap tightly with plastic and refrigerate. The quenelles are served cool, best the next day and for 3 days after.
- Serve with fresh horseradish and matzah for Passover.
Prepared Horseradish garnish recipe:
- 1 (8 to 10-inch long) piece horseradish root (4 to 5 ounces)
- 2 tablespoons water, more as needed
- 1 tablespoon white vinegar, more as needed
- Pinch salt
Peel and chop your horseradish root into half inch cubes, then pulse in a sturdy food processor with the other ingredients. Store in the refrigerator for up to 3 weeks (or as long as it takes to finish all the gefilte fish the rest of your family refused to eat.)
Cooking with Crosby Roamann: Seared Herb-Crusted NY Strip Steak with BA.1 Steak Sauce
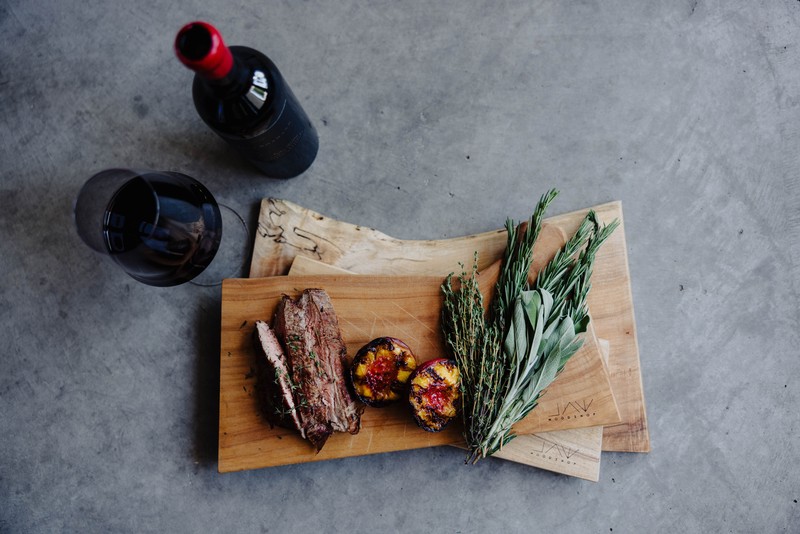
For our herb-crusted NY Strip Steak, we choose prime cuts at least 1-inch think, and apply a rub of 1 tablespoon each dried thyme, rosemary, oregano, and Kosher Salt. We let these sit for the day in the fridge, and then for an hour at room temperature before cooking. We prefer cast iron skillets for searing steaks at home, with one tablespoon of butter and a tablespoon of good olive oil, which we let begin to smoke in the skillet before we add the steaks. We fry these at the highest temperature we can for 3-4 minutes per side, and then finish them in the oven, covered for 2-4 minutes, until an instant read thermomemter registers 145F interior temp. We then let the steaks rest on a wood cutting board for 5 minutes before serving.
Pair this with our 2020 Crosby's Reserve Cabernet Sauvignon, available here.
- 2 Tbsp. balsamic vinegar
- 2 Tbsp. Worcestershire sauce
- 2 Tbsp. ketchup
- 1 Tbsp. extra-virgin olive oil
- 1 Tbsp. vinegar-based hot sauce (such as Frank’s or Crystal)
- 1 tsp. Dijon mustard
- 1 tsp. honey
- Kosher salt
Combine ingredients in a small bowl and mix well. BA says, "sauce can be made 2 months ahead. Store airtight at room temperature," but we store ours in the fridge.